JAVA基于netty实现socket tcp通讯服务,并实现导出可执行jar包,在服务器上独立运行 |
您所在的位置:网站首页 › netty tcp 服务端 › JAVA基于netty实现socket tcp通讯服务,并实现导出可执行jar包,在服务器上独立运行 |
JAVA基于netty实现socket tcp通讯服务,并实现导出可执行jar包,在服务器上独立运行
|
#JAVA基于netty实现socket tcp通讯服务,并实现导出jar包,在服务器上独立运行 ##netty源码下载 官网下载地址:https://netty.io/downloads.html ###服务端代码 ####EchoServer.java package com.jxhtyw.modules.socket.server; import java.nio.charset.Charset; import io.netty.bootstrap.ServerBootstrap; import io.netty.channel.ChannelFuture; import io.netty.channel.ChannelInitializer; import io.netty.channel.ChannelOption; import io.netty.channel.EventLoopGroup; import io.netty.channel.nio.NioEventLoopGroup; import io.netty.channel.socket.SocketChannel; import io.netty.channel.socket.nio.NioServerSocketChannel; import io.netty.handler.codec.bytes.ByteArrayEncoder; import io.netty.handler.codec.string.StringEncoder; public class EchoServer { private final int port; public EchoServer(int port) { this.port = port; } public void start() throws Exception { EventLoopGroup bossGroup = new NioEventLoopGroup(); EventLoopGroup group = new NioEventLoopGroup(); try { ServerBootstrap sb = new ServerBootstrap(); sb.option(ChannelOption.SO_BACKLOG, 1024); sb.group(group, bossGroup) // 绑定线程池 .channel(NioServerSocketChannel.class) // 指定使用的channel .localAddress(this.port)// 绑定监听端口 .childHandler(new ChannelInitializer() { // 绑定客户端连接时候触发操作 @Override protected void initChannel(SocketChannel ch) throws Exception { System.out.println("报告"); System.out.println("信息:有一客户端链接到本服务端"); System.out.println("IP:" + ch.localAddress().getHostName()); System.out.println("Port:" + ch.localAddress().getPort()); System.out.println("报告完毕"); ch.pipeline().addLast(new StringEncoder(Charset.forName("GBK"))); ch.pipeline().addLast(new EchoServerHandler()); // 客户端触发操作 ch.pipeline().addLast(new ByteArrayEncoder()); } }); ChannelFuture cf = sb.bind().sync(); // 服务器异步创建绑定 System.out.println("socket服务端启动成功,监听端口: " + cf.channel().localAddress()); cf.channel().closeFuture().sync(); // 关闭服务器通道 } finally { group.shutdownGracefully().sync(); // 释放线程池资源 bossGroup.shutdownGracefully().sync(); } } public static void main(String[] args) throws Exception { new EchoServer(8888).start(); // 启动 } }####EchoServerHandler.java package com.jxhtyw.modules.socket.server; import io.netty.buffer.ByteBuf; import io.netty.buffer.Unpooled; import io.netty.channel.ChannelFutureListener; import io.netty.channel.ChannelHandlerContext; import io.netty.channel.ChannelInboundHandlerAdapter; import io.netty.util.CharsetUtil; import java.io.UnsupportedEncodingException; public class EchoServerHandler extends ChannelInboundHandlerAdapter { /** * channelAction * channel 通道 action 活跃的 * 当客户端主动链接服务端的链接后,这个通道就是活跃的了。也就是客户端与服务端建立了通信通道并且可以传输数据 */ public void channelActive(ChannelHandlerContext ctx) throws Exception { System.out.println(ctx.channel().localAddress().toString() + " 通道开启!"); } /** * channelInactive * channel 通道 Inactive 不活跃的 * 当客户端主动断开服务端的链接后,这个通道就是不活跃的。也就是说客户端与服务端的关闭了通信通道并且不可以传输数据 */ public void channelInactive(ChannelHandlerContext ctx) throws Exception { System.out.println(ctx.channel().localAddress().toString() + " 通道关闭!"); // 关闭流 } /** * * @author Taowd * TODO 此处用来处理收到的数据中含有中文的时 出现乱码的问题 * @param buf * @return */ private String getMessage(ByteBuf buf) { byte[] con = new byte[buf.readableBytes()]; buf.readBytes(con); try { return new String(con, "UTF-8"); } catch (UnsupportedEncodingException e) { e.printStackTrace(); return null; } } /** * 功能:读取客户端发送过来的信息 */ @Override public void channelRead(ChannelHandlerContext ctx, Object msg) throws Exception { // 第一种:接收字符串时的处理 ByteBuf buf = (ByteBuf) msg; String rev = getMessage(buf); System.out.println("服务端收到客户端数据:" + rev); } /** * 功能:读取完毕客户端发送过来的数据之后的操作 */ @Override public void channelReadComplete(ChannelHandlerContext ctx) throws Exception { System.out.println("服务端接收数据完毕.."); // 第一种方法:写一个空的buf,并刷新写出区域。完成后关闭sock channel连接。 //ctx.writeAndFlush(Unpooled.EMPTY_BUFFER).addListener(ChannelFutureListener.CLOSE); String returnInfo = "服务端已接收数据!"; ctx.writeAndFlush(Unpooled.copiedBuffer(returnInfo, CharsetUtil.UTF_8)).addListener(ChannelFutureListener.CLOSE); // 第二种方法:在client端关闭channel连接,这样的话,会触发两次channelReadComplete方法。 // ctx.flush(); // ctx.flush(); // 第三种:改成这种写法也可以,但是这种写法,没有第一种方法的好。 // ctx.flush().close().sync(); } /** * 功能:服务端发生异常的操作 */ @Override public void exceptionCaught(ChannelHandlerContext ctx, Throwable cause) throws Exception { ctx.close(); System.out.println("异常信息:\r\n" + cause.getMessage()); } }###客户端代码(基于netty) ####EchoClient.java package com.jxhtyw.modules.socket.client; import java.net.InetSocketAddress; import java.nio.charset.Charset; import io.netty.bootstrap.Bootstrap; import io.netty.channel.ChannelFuture; import io.netty.channel.ChannelInitializer; import io.netty.channel.EventLoopGroup; import io.netty.channel.nio.NioEventLoopGroup; import io.netty.channel.socket.SocketChannel; import io.netty.channel.socket.nio.NioSocketChannel; import io.netty.handler.codec.bytes.ByteArrayEncoder; import io.netty.handler.codec.string.StringEncoder; import io.netty.handler.stream.ChunkedWriteHandler; public class EchoClient { private final String host; private final int port; public EchoClient() { this(0); } public EchoClient(int port) { this("localhost", port); } public EchoClient(String host, int port) { this.host = host; this.port = port; } public void start() throws Exception { EventLoopGroup group = new NioEventLoopGroup(); try { Bootstrap b = new Bootstrap(); b.group(group) // 注册线程池 .channel(NioSocketChannel.class) // 使用NioSocketChannel来作为连接用的channel类 .remoteAddress(new InetSocketAddress(this.host, this.port)) // 绑定连接端口和host信息 .handler(new ChannelInitializer() { // 绑定连接初始化器 @Override protected void initChannel(SocketChannel ch) throws Exception { System.out.println("正在连接中..."); ch.pipeline().addLast(new StringEncoder(Charset.forName("GBK"))); ch.pipeline().addLast(new EchoClientHandler()); ch.pipeline().addLast(new ByteArrayEncoder()); ch.pipeline().addLast(new ChunkedWriteHandler()); } }); ChannelFuture cf = b.connect().sync(); // 异步连接服务器 System.out.println("服务端连接成功..."); // 连接完成 cf.channel().closeFuture().sync(); // 异步等待关闭连接channel System.out.println("连接已关闭.."); // 关闭完成 } finally { group.shutdownGracefully().sync(); // 释放线程池资源 } } public static void main(String[] args) throws Exception { new EchoClient("127.0.0.1", 8888).start(); // 连接服务端并启动 } }####EchoClientHandler.java package com.jxhtyw.modules.socket.client; import java.nio.charset.Charset; import io.netty.buffer.ByteBuf; import io.netty.buffer.ByteBufUtil; import io.netty.buffer.Unpooled; import io.netty.channel.ChannelHandlerContext; import io.netty.channel.SimpleChannelInboundHandler; import io.netty.util.CharsetUtil; public class EchoClientHandler extends SimpleChannelInboundHandler { /** * 向服务端发送数据 */ @Override public void channelActive(ChannelHandlerContext ctx) throws Exception { System.out.println("客户端与服务端通道-开启:" + ctx.channel().localAddress() + "通道开启!"); String sendInfo = "你好,我是客户端!"; System.out.println("客户端向服务端发送数据:" + sendInfo); ctx.writeAndFlush(Unpooled.copiedBuffer(sendInfo, CharsetUtil.UTF_8)); // 必须有flush } /** * channelInactive * * channel 通道 Inactive 不活跃的 * * 当客户端主动断开服务端的链接后,这个通道就是不活跃的。也就是说客户端与服务端的关闭了通信通道并且不可以传输数据 * */ public void channelInactive(ChannelHandlerContext ctx) throws Exception { System.out.println("客户端与服务端通道-关闭:" + ctx.channel().localAddress() + "通道关闭!"); } @Override protected void channelRead0(ChannelHandlerContext ctx, ByteBuf msg) throws Exception { ByteBuf buf = msg.readBytes(msg.readableBytes()); System.out.println("收到服务端反馈信息:" + ByteBufUtil.hexDump(buf) + "; 数据包为:" + buf.toString(Charset.forName("utf-8"))); } @Override public void exceptionCaught(ChannelHandlerContext ctx, Throwable cause) throws Exception { ctx.close(); System.out.println("异常退出:" + cause.getMessage()); } }###客户端代码(源生socket) ####Client.java package com.jxhtyw.modules.socket.client; import java.io.BufferedReader; import java.io.IOException; import java.io.InputStream; import java.io.InputStreamReader; import java.io.OutputStream; import java.io.PrintWriter; import java.net.Socket; import java.net.UnknownHostException; public class Client { public static void main(String[] args) { try { //创建客户端Socket,指定服务器地址和端口 Socket socket = new Socket("127.0.0.1", 8888); //建立连接后,获取输出流,向服务器端发送信息 OutputStream os = socket.getOutputStream(); //输出流包装为打印流 PrintWriter pw = new PrintWriter(os); //向服务器端发送信息 String sendInfo = "你好,我是客户端!"; pw.write(sendInfo);//写入内存缓冲区 pw.flush();//刷新缓存,向服务器端输出信息 socket.shutdownOutput();//关闭输出流 System.out.println("客户端向服务端发送数据:"+sendInfo); //获取输入流,接收服务器端响应信息 InputStream is = socket.getInputStream(); BufferedReader br = new BufferedReader(new InputStreamReader(is, "utf-8")); String data = null; while((data=br.readLine())!= null){ System.out.println("收到服务器端反馈信息:"+data); } //关闭其他资源 // br.close(); // is.close(); // pw.close(); // os.close(); socket.close(); } catch (UnknownHostException e) { e.printStackTrace(); } catch (IOException e) { e.printStackTrace(); } } }##测试 ###启动服务端,设置服务端端口,此处为’8888’ ###运行客户端,向服务端发送数据 ####方式一(基于netty) 运行EchoClient.java中的main方法 客户端控制台输出内容: ####每一项属性后面需加回车换行 ###将工程导出为jar包 ####右键工程,export–>JAR file–>Next 看到上述内容表示运行成功,运行客户端,测试结果如下,数据接收成功: |
 本案例采用jar包导出形式,所以使用普通java web工程实现,需将netty依赖jar包放到工程中(jar包在源码中都有)
  ##详细代码 ###工程目录结构


 客户端控制台输出内容:
  服务端控制台输出内容:
  ####方式二(源生socket) 运行Client.java中的main方法
 服务端控制台输出内容:
  ##将工程导出为可执行jar包 ###修改MANIFEST.MF文件,文件目录如下:
  ###MANIFEST.MF文件格式要求 ####Class-Path、Main-Path等每一项配置后面都要加一个空格
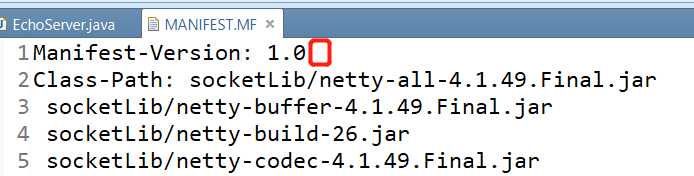
 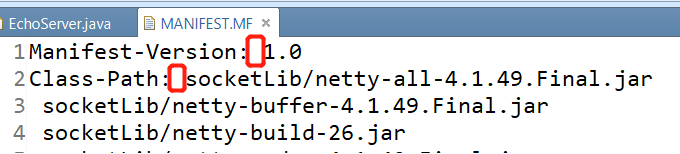 ####多个jar包路径之间用空格隔开,如需换行,在每一行前面加一个空格(jar包太多必须换行,每一行长度超长将在导出jar包时报line too long)
 ###MANIFEST.MF文件内容如下:
 ####选择jar包导出路径,点击Next
  ####继续next
  ####指定MANIFEST.MF,点击finish,完成导出
  ###将导出的jar包拷贝至需要运行的服务器上(此处以本机为例,windows环境),在jar包同级目录下创建文件夹用于存放外部依赖jar包(工程依赖的jar包,已在第一步说明),文件夹名称与结构与MANIFEST.MF中的Class-Path配置保持一致
 ###执行jar包 打开命令窗,移动至需执行jar包所在文件夹,输入命令 java -jar jxhtywSocket.jar,回车

【本文地址】
今日新闻 |
推荐新闻 |